Undo
Reverses the effect of the most recent image editing or filtering operation. Note that operations on entire stacks cannot be reversed using Undo.Cut
Copies the contents of the current image selection to the internal clipboard and fills it with the current background color.Copy
Copies the contents of the current image selection to the internal clipboard. If there is no selection, copies the entire active image. The amount of image data copied is shown in the status bar. Use the Copy to System command to copy to the system clipboard. Use File>New>Internal Clipboard to create a new window from the contents of the internal clipboard. Pressing the 'c' key is a convenient shortcut for this command.Paste
Inserts the contents of the internal clipboard into the active image. The pasted image is automatically selected, allowing it to be dragged with the mouse. Click outside the selection to terminate the paste. Select Edit>Undo to abort the paste operation. Pressing the 'v' key is a convenient shortcut for this command.Use the File>New>System Clipboard command to paste from the system clipboard. With ImageJ 1.38a and later, Edit>Paste pastes from the system clipboard if the internal clipboard is empty. If it is not empty, and no images are open, Edit>Paste opens a new image window to display the internal clipboard.
Paste Control...
After a Paste, use the Paste Control popup menu to control how the image currently being pasted is transferred to the destination image.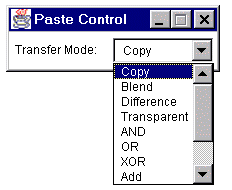
Except for "Blend" and "Transparent", the Paste Control transfer modes are the same as those listed in the description of Process>Image Calculator. The "Blend" mode is the same the Image Calculator "Average" mode. In "Transparent" mode, white pixels are transparent and all other pixels are copied unchanged. "Transparent" mode only works with 8-bit and RGB images.
Clear
Erases the contents of the selection to the current background color (normally white). The backspace (or delete) key is a handy shortcut for this command. Alt-click in the Image>Colors>Color Picker window to change the background color.Clear Outside
Erases the area outside the current image selection to the background color. Alt-click in the Image>Colors>Color Picker window to change the background color.Fill
Fills the current selection with the current foreground color. The foreground color is set by using the dropper tool to "pick up" a new color from an image. Alt-click with any other tool, except the magnifying glass, to temporarily switch to the dropper tool. Colors can be "picked up" from the Image>Colors>Color Picker window using any tool. The dropper tool icon in the tool bar is drawn in the foreground color and the frame around it is drawn in the background color.Draw
Outlines the current selection using the current foreground color and line width. The "Colors" window, opened with the Image>Colors>Color Picker command, provides a palette of drawing colors. Colors can be "picked" up from the "Colors" window without having to switch to the dropper tool. Use the Edit>Options>Line Width command, or double-click on the freeline tool, to change the line width.Invert
Creates a reversed image, similar to a photographic negative, of the entire image or selection.Selection Submenu
The commands in this submenu create, delete or modify selections.Select All
Creates a rectangular selection that is the same size as the image.Select None
Deactivates the selection in the active image.Restore Selection
Restores the previous selection to its original position. A selection is saved when you:You can transfer a selection from one image to another by activating the image with the selection, activating the destination image, then pressing shift-e (the keyboard shortcut for Restore Selection).
- Delete the selection by clicking outside of it
- Draw a new selection
- De-activate the image containing the selection
- Close the image containing the selection
- Open a new selection using File>New
- Use a command that deletes or modifies the selection
Fit Spline
Fits a cubic spline curve to a polygon or polyline selection.Fit Ellipse
Replaces an area selection with the best fit ellipse. The ellipse will have the same area, orientation and centroid as the original selection. The same fitting algorithm is used to measure the major and minor axis lengths and angle when "Fit Ellipse" is selected in Analyze>Set Measurements.Convex Hull
Replaces a polygon of freehand selection with its convex hull, which can be thought of as a rubber band wrapped tightly around the points that define the selection.Make Inverse
Creates an inverse selection. What was "inside" the selection is now "outside", and vis versa.Create Mask
Creates a new 8-bit image called "Mask" whose pixels have a value of 255 inside the selection and 0 outside. By default, this image has an inverting LUT, so black is 255 and white is 0. Check "Black Background" in Process>Binary>Options before using Create Mask and an inverting LUT will not be used (black will be 0 and white 255).Create Selection
Creates a selection from a thresholded image or a binary mask. This command is based on the Threshold_To_Selection plugin written by Johannes Schindelin.Rotate...
Rotates the selection by the specified number of degrees (negative number indicate counter-clockwise rotation).Enlarge...
Grows an area selection by a specified number of pixels. Enter a negative value to shrink the selection. Enter zero to convert a composite selection into a polygon selection.Make Band...
Takes an area selection and creates a band with a thickness of the specified number of pixels. If you imagine the band as a doughnut shape, then the original selection corresponds to the hole (i.e. the band is made by growing out the original selection).Specify...
Opens a dialog that allows your to define a rectangular or elliptical selection. Width and Height are the dimensions of the selection. X Coordinate and Y Coordinate define the position of the selection. Check Oval to create an elliptical selection. If Centered is checked, the selection is positioned so X Coordinate and Y Coordinate define the center of the selection, otherwise they define the upper left corner.Add to Manager
Adds the current selection to the ROI Manager. If there is no selection then it opens the ROI Manager. As a shortcut, press "t". (Except when using the text editor, you do not have to hold down the control key to use menu shortcuts).
![[Selections]](../images/selection-fits.gif)
Options Submenu
Use commands in this submenu to change various ImageJ user preference settings.Line Width...
Displays a dialog box that allows the width of lines generated by the Draw command to be changed.
Input/Output...
JPEG Quality specifies the compression level uses by the File>Save As>Jpeg command. Requesting a higher degree of compression (a lower value) will result in smaller files, but poorer image quality. Please note that it is not a good idea to use lossy-encoded JPEG formatted images when doing image processing and analysis because it alters the content of the original image and introduces artifacts.File Extension for Tables is the default extension (not format) using when saving tables (e.g., the Results table).
Check Use JFileChooser to Open/Save to enable versions of File>Open and File>Save As> that use the Java JFileChooser instead of the native OS file open and save dialogs. The main advantage of JFileChooser is the ability to open multiple files by shift-clicking to select multiple contiguous files and control-clicking to select more than one individual file. On the other hand, it is slower, uses more memory, and does not behave like the file open and save dialogs used in other applications.
Export Raw in Intel Byte Order specifies the byte order used when saving 16-bit and 32-bit images using File>Save As>Raw Data. Check this option to export images using the order used by Intel x86 based processors (little-endian). This Wikipedia article has more information.
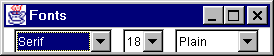
Fonts...
Opens a small window with three popup menus for specifying the type face, size and style of the font used by the text tool.
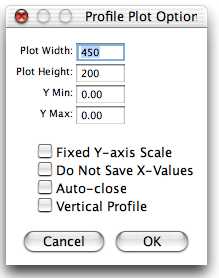
Profile Plot Options...
Use this dialog to control how plots generated by Analyze>Plot Profile are displayed.Plot Width and Plot Height specify the size of the plot in pixels. If Fixed Y-axis Scale is checked, the y-axis range is fixed and the specified Y Min and Y Max values are used, otherwise, plots are scaled based on the minimum and maximum gray values. Check Do Not Save X-Values to have "List", "Save" and "Copy" in profile plot windows display or save only y-values. Check Auto-close to have profile plot windows automatically closed when "List", "Save" or "Copy" are clicked on. Check Vertical Profile to generate row average plots of rectangular areas instead of the default column average plots.
Point Tool...
Use this dialog to configure the point selection tool. You can also display this dialog by double-clicking on the point tool icon.If Mark Width is greater than zero, and Auto-Measure is enabled, a mark of the specified size is drawn when you click with the point tool. If Auto-Measure is not enabled, the mark is drawn when you use the Measure command. If Auto-Measure is enabled, ImageJ records the location of point tool mouse clicks. If Auto-Next Slice is checked, ImageJ advances to the next stack slice after each measurement is recorded.
Conversions...
Use this dialog to set options that control how images are converted from one type to another.Check Scale When Converting to have ImageJ scale from min-max to 0-255 when converting from 16-bits or 32-bits to 8-bits or to scale from min-max to 0-65535 when converting from 32-bits to 16-bits. Note that Scale When Converting is always checked after ImageJ is restarted.
If Weighted RGB to Grayscale Conversion is checked, the formula gray=0.299*red+0.587*green+0.114*blue is used to convert RGB images to grayscale. If it is not checked, the formula gray=(red+green+blue)/3 is used. The default weighting factors (0.299,0.587,0.114), which are based on human perception, are the ones used to convert from RGB to YUV, the color encoding system used for analog television. The weighting factors can be modified using the setRGBWeights macro function.
Memory...
Use this dialog to specify the maximum amount of memory available to ImageJ.Java applications such as ImageJ will only use the memory allocated to them but this dialog allows the user to allocate more than the default 128MB. Note that specifying more than 75% of real RAM could result in virtual RAM being used, which may cause ImageJ to become slow and unstable. Also note that this dialog cannot be used to set the memory allocation if ImageJ is run from the command line or by double-clicking on ij.jar.
Click on the status bar and ImageJ will display the amount of memory currently in use and the maximum amount available. In the illustration, 129MB out of the available 1000MB, or 12%, is in use. Clicking on the status bar also runs the Java garbage collector, which will attempt to reclaim unused memory.
Misc...
Displays a dialog box containing miscellaneous options.The Divide by Zero Value specifies the value used when Process>Image Calculator detects a divide by zero while dividing one 32-bit real image by another. The default is infinity. In addition to numeric values, "infinity" (positive or negative infinity), "max" (largest positive value) and "NaN" (Not-a-Number) can be entered as the Divide by Zero Value value.
Check Use Pointer Cursor and ImageJ will use an arrow cursor instead of the default crosshair that is sometimes difficult to see on grayscale images in areas of medium brightness. This option can also be used to work around a bug on Windows where the text cursor is sometimes used in place of the crosshair. Note that ImageJ must be restarted when running v1.33l and earlier.
Check Hide "Process Stack?" Dialog to suppress the dialog that asks "Process all xx slices?" (only the current slice will be processed).
Check Antialiased Tool Icons to smooth and darken the tool icons in the ImageJ window. On Mac OS X, this option is always enabled. On Windows XP, enable Clear Type sub-pixel antialiasing to improve the quality of text in menus, as shown in the illustration.
Check Require Command Key for Shortcuts to require that the control key (command key on Macs) be pressed when using keyboard shortcuts for menu command.Check Debug Mode to enable display of debugging messages in the "Log" window. Close the "Log" window to disable display of debugging messages.
![[Dialog]](../images/io-options.gif)
![[Point Tool Dialog]](../images/point-tool-dialog.jpg)
![[Dialog]](../images/conversion-options.jpg)
![[Dialog]](../images/memory1.jpg)
![[Screen shot]](../images/memory2.jpg)
![[Misc dialog]](../images/misc.jpg)
![[ImageJ Window]](../images/antialiasing.gif)