- New>
- Open...
- Open Samples>
- Open Recent>
- Import>
- Close
- Save
- Save As>
- Revert
- Page Setup...
- Print...
- Quit
New Submenu
This submenu contains commands for creating new images, stacks or text windows.Image... (n)
Creates a new image window or stack. A dialog box allows you to specify the image title, type, dimensions and initial content.Name is the title that will be used for the Window. Type is the image type: 8-bit grayscale, 16-bit grayscale (unsigned), 32-bit (float) grayscale or RGB color. Fill With (White, Black or Ramp) specifies how the image is initialized. Width and Height specify the image dimensions in pixels. Set Slices to a value greater than one to create a stack.
Text Window (shift+n)
Creates a new text window with the title "Untitled.txt".Internal Clipboard
Opens the contents of the internal ImageJ clipboard as a new image.System Clipboard (shift+v)
Opens the contents of the operating system clipboard as a new image (requires Java 1.4 or later).
Open...
Reads an image and displays it in a separate window. Files must be in TIFF, GIF, JPEG, DICOM, BMP, PGM or FITS format. Also opens ImageJ and NIH Image lookup tables (with ".lut" extension). Additional file formats are supported via plugins installed in the Import submenu.TIFF images can be 1-bit, 8-bits, 16-bits (unsigned), 32-bit (real) or RGB color. TIFF files with multiple images of the same type and size open as a stack. Enable debugging using Edit>Options>Misc and ImageJ will display the TIFF tags as the file is opened.DICOM (Digital Imaging and Communications in Medicine) is a standard popular in the medical imaging community. Support in ImageJ is limited to uncompressed DICOM files. DICOM files containing multiple images open as a stack. Use Image>Show Info to display the DICOM header information. Use File>Import>Image Sequence to import a DICOM sequence. With ImageJ 1.34k and later, imported sequences are sorted by image number instead of by file name and the tags are preserved when DICOM images are saved in TIFF format. Chris Rorden's DICOM page at http://www.mrc-cbu.cam.ac.uk/personal/chris.rorden/dicom.htm is a good DICOM resource.
FITS (Flexible Image Transport System) image is the format adopted by the astronomical community for data interchange and archival storage. Use Image>Show Info to display the FITS header. Information about FITS is available from http://fits.gsfc.nasa.gov.
PGM (Portable GreyMap), PBM (Portable BitMap) and PPM (Portable PixMap) are simple image formats that use an ASCII header. A description of these formats can be found at astronomy.swin.edu.au/~pbourke/dataformats/ppm/.
Open Samples Submenu
This submenu opens example images downloaded from the ImageJ Web site. The images can also be downloaded from http://rsb.info.nih.gov/ij/images/ and opened using File>Open. Press "i" (Image>Show Info) to display the tags of the DICOM samples. The sample images are useful for creating sample macros that use the same image, regardless of where the macro is run.Open RecentSubmenu
The submenu contains a list of the last 15 files opened, allowing them to be easily retrieved.Import Submenu
This submenu lists the installed image acquisition plugins.Image Sequence...
Opens a sequence of images in a folder as a stack. The images must all be the same size and type. They can be in TIFF, JPEG, DICOM, BMP, GIF, FITS or PGM format. There are two dialog boxes: one to select the folder and one to specify options. In the first dialog, select one of the images in the folder and click "Open". Use the second (shown below) to specify which images in the folder to open and/or to have the images converted to 8-bits or reduced in size.Use the Number of Images field to specify how many images to open. Set Starting Image to n to start with the nth image in the folder. Set Increment to "2" to open every other image, to "3" to read every third image, etc. Type a string into the File Name Contains field and ImageJ will only open files whose name contains that string. Checking Convert to 8-bit Grayscale reduces memory requirements by 50% for 16-bit images and by 75% for 32-bit and RGB images. Checking Open 1/2 Size reduces memory requirements 75%. The size (widthxheightxdepth) of the stack that will be created is displayed at the bottom on the dialog box.
Another way to open an image sequence is to use the OpenSeriesUsingFilter macro, which opens a series of images as a stack using a customizable file name filter.
LUT...
Opens an NIH Image lookup table, or a raw lookup table. The raw LUT file must be 768 bytes long and contain 256 reds, 256 blues and 256 greens. If no image is open, a 256x32 ramp image is created to display the LUT. Lookup tables with file names ending in ".lut" can also be opened using File>Open.Text Image...
Opens a tab-delimited text file as a 32-bit real image. The image's width and height are determined by scanning the file and counting the number of words and lines. Use Image>Lookup Tables>Invert LUT to correctly display text files imported from NIH Image. For text files with integer values no larger than 255, use Image>Type>8-bit to convert to 8-bits. Before converting, disable "Scale When Converting" in Edit>Options>Conversions to prevent the image from being scaled to 0-255.Text File...
Opens a text file. Right click (command-click on the Mac) in a text window to activate a pop-up menu with Save As, Cut, Copy, Paste and Select All commands. Most text files can also be opened using File>Open.URL...
Downloads and displays a TIFF, ZIP compressed TIFF, GIF, JPEG or DICOM image specified by a URL. TIFF file names must end in ".tif", ZIP file names must end in ".zip" and DICOM files names must end in ".dcm". The URL is opened in the users default browser if it ends with "/" or ".html". Here are some example URLs:http://rsb.info.nih.gov/ij/images/clown.gifHere are
http://rsb.info.nih.gov/ij/images/ct.dcm
file:///Macintosh HD/images/Nanoprobes.tif
file:///D:\images\neuron.tif
http://rsb.info.nih.gov/ij/ (opens ImageJ website)
Raw...
Use this command to import images that are not in a file format directly supported by ImageJ. You will need to know certain information about the layout of the image file, including the size of the image, and the offset to the beginning of the image data.Use the pop-up menu at the top of the dialog box to specify the image type. There are nine choices:
Interleaved RGB images have pixels stored contiguously (rgbrgbrgb...) in a single image plane. Planar RGB images have the red, green and blue image data stored in separate 8-bit sample planes. ImageJ saves RGB images (both TIFF and raw) in interleaved format.
- 8-bit unsigned integer
- 16-bit signed integer (converted to unsigned by adding 32,768)
- 16-bit unsigned integer
- 32-bit signed integer (converted to float)
- 32-bit floating-point
- 24-bit RGB color (interleaved)
- 24-bit RGB color (planar)
- 32-bit ARGB color
- 1-bit Bitmap (converted to 8-bit)
Image Width is the number of pixel in each row of image data and Image Height is the number of rows in the image. Offset to First Image is the number of bytes in the file before the first byte of image data.
Number of Images is the number of images stored in the file. If this value is greater than the actual number of images the resulting stack will get truncated to the actual size.
Gap Between Images is the number of bytes from the end of one image to the beginning of the next. Set this value to width x height x bytes-per-pixel x n to skip n images for each image read.
Check Black is Zero if black pixels are represented using numbers that are less than the numbers used for white pixels. If your images look like photographic negatives, changing this field should fix the problem.
Little Endian Byte Order will probably need to be checked when importing 16-bit or 32-bit grayscale images from little-endian machines such as Intel based PCs.
Check Open All and ImageJ will import all the images in the folder as a stack. The images must all be the same size and type.
Close
Closes the currently active image window. If the image has changed, you will be asked if you want to save the changes.Save
Saves the active image or stack in TIFF format. To save only a selected area, create a rectangular selection and use the Image>Duplicate command.Save As Submenu
Use this submenu to save the active image in TIFF, GIF, JPEG, or "raw" format. Can also be used to save measurement results, lookup tables, selections, and selection XY coordinates.Tiff...
Saves the active image or stack in TIFF format. TIFF is the only format (other than "raw") that supports all ImageJ data types and the only format that saves spatial and density calibration.Gif...
Saves the active image in GIF format. The image must be 8-bits in depth. If it's not, convert it to 8-bit color using Image>Type>8-bit Color or to 8-bit grayscale using Image/Type/8-bit.Jpeg...
Saves the active image in JPEG format. Edit JPEG Quality in Edit>Options>Input/Output to specify the JPEG compression level (0-100). Lower values produce smaller files but poorer quality. Larger values produce larger files but better quality. Warning: the JPEG format uses lossy compression that can result in artefacts. This format should not be used if you plan to make measurements on the image or to do further processing.ZIP...
Saves the active image or stack as a TIFF file inside a compressed ZIP archive.Raw Data...
Saves the active image or stack as raw pixel data without a header. 16-bit images are saved as unsigned shorts. 16-bit and 32-bit (float) images are saved using big-endian byte order unless "Export Raw in Intel Byte Order" is checked in the Edit>Options>Input/Output dialog box. Note that the option to save in Intel byte order requires ImageJ 1.37 or later.Text Image...
Saves the active image as a spreadsheet compatible tab-delimited text file. For calibrated images and floating-point images, the "Decimal Places" field in Analyze>Set Measurements determines the number of digits to the right of the decimal point. For RGB images, each pixel is converted to grayscale using the formula gray=(red+green+blue)/3 or the formula gray=0.299red+0.587green+0.114blue if "Weighted RGB to Grayscale Conversion" is checked in Edit>Options>Conversions.Image Sequence...
Saves all the slices in the active stack as separate tiff, gif, jpeg or raw files.AVI...
Saves the active stack as an uncompressed AVI file. Windows users can use VirtualDub to open uncompressed AVI files and resave as a compressed AVI. Macintosh users can use the QuickTime Movie Player program to open uncompressed AVI files and, with the Pro version, resave in compressed QuickTime format.LUT...
Saves the active image's lookup table to a file. The 768 byte file consists of 256 red values, 256 green values and 256 blue values.Measurements...
Exports the contents of the "Results" window as a tab-delimited text file.Selection...
Saves the current area selection boundary to a file. Use File>Open to restore the selection.XY Coordinates...
Exports the XY coordinates of the line selection or area selection boundary as a two column, tab-delimited text file. Coordinates of rectangular, oval and straight line selections can not be exported. Use the Path Writer plugin plugin to save coordinates at evenly spaced one pixel intervals.
Revert
Replaces the active image with the last saved version. This is a shortcut for closing the window without saving, and then reopening it. The command currently does not work with stacks.Page Setup...
The Page Setup dialog allows you to control the size of printed output, plus other printing options.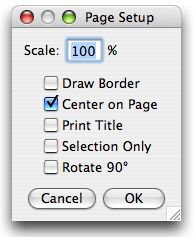
Scale values less than 100% reduce the size of printed images and values greater than 100% increase the size. 100% corresponds to 72 pixels per inch, about the unzoomed screen size of the image. The size of the printed image is determined by the Scale value and the width and height of the image in pixels. Spatial calibration is ignored.
Check Draw Border to have ImageJ print a one pixel wide black border around the image. Check Center on Page and the image will be printed in the center of the page instead of in the upper left corner. Check Print Title to have the title of the image printed at the top of the page. Check Selection Only to print the selection instead of the entire image. Check Rotate 90° and the image will be rotated 90° to the left before being printed (ImageJ 1.33m or later).